
How to Create Conditional Automation With an Auto Clicker
Conditional automation helps auto clickers respond to screen changes instead of clicking at fixed intervals. Have you ever used an auto clicker that kept clicking even after a button disappeared? That’s because basic auto clickers follow a set timer. They don’t know when a button is ready.
Conditional automation solves this problem by adding rules to your workflow. Instead of clicking every few seconds, the software can wait for a button, detect a screen change, or check if an action is complete.
For example, you might want to click an OK button after a desktop app finishes a task. With the right tool, you can set a rule that waits until the button appears before clicking it.
However, not every auto clicker supports these features. You’ll need a tool that can check screen images, pixel colors, or other conditions.
This guide explains how conditional clicking works, how to set up your first workflow, and how to fix common problems.
What Is Conditional Automation in an Auto Clicker?
Conditional automation lets software perform an action only when a set rule is true.
A basic auto clicker repeats clicks at a chosen speed. In contrast, a conditional tool checks what is happening before taking action.
The idea is simple:
IF something happens, THEN perform an action.
For example:
- IF a button appears, THEN click it.
- IF a task is still running, THEN keep waiting.
- IF an error appears, THEN stop the workflow.
- IF a window becomes active, THEN continue the next step.
These rules help prevent clicks at the wrong time.
How Conditional Auto Clicking Works
Most conditional workflows have three main parts:
- Trigger: Something the software needs to check, such as a button appearing.
- Condition: A rule that decides whether the action should run.
- Action: The click, keypress, or next step that happens when the rule is true.
This way, the software waits for the correct moment instead of clicking at random.
Traditional vs. Conditional Auto Clickers
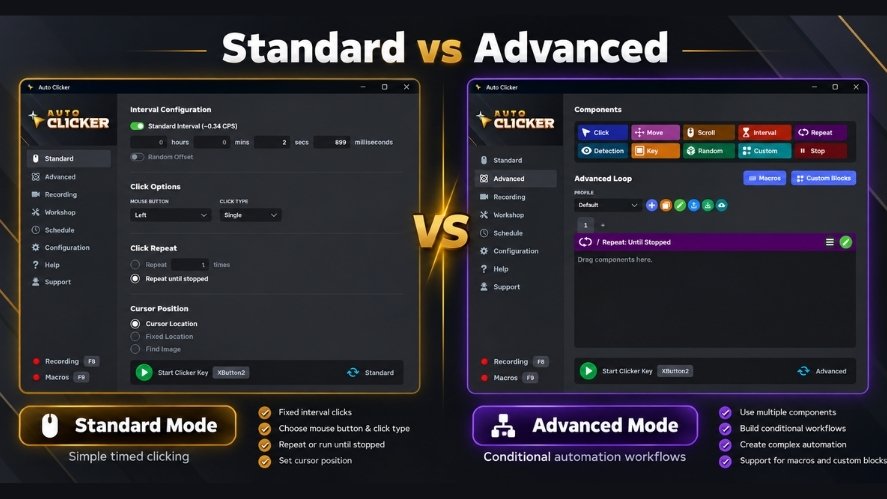
Both tools can reduce manual clicking. However, they work in different ways.
| Feature | Basic Auto Clicker | Conditional Automation Tool |
|---|---|---|
| Clicking | Repeats at set intervals | Clicks when rules are met |
| Screen detection | Usually not available | Available in supported tools |
| Image matching | Usually not supported | Available in some tools |
| Multiple steps | Often limited | Supports more complex workflows |
| Best for | Simple repeated clicks | Tasks that change as they run |
| Setup | Usually simple | May need more planning |
A basic auto clicker is often enough when a button stays in one place.
However, conditional automation is more useful when buttons appear at different times or a task has several stages.
Why Use Conditional Automation?
The biggest benefit is better control over when clicks happen.
For example, an app might take three seconds to finish one task and ten seconds to finish another. A fixed timer can’t always handle that change.
Conditional rules can help in several ways.
Reduce Repeated Manual Work
Some tasks require you to watch the screen and click when something changes.
With the right setup, a macro can check the screen for you and respond when the expected result appears.
This is useful for routine tasks in desktop apps or test programs.
Avoid Clicking Too Early
Let’s say a button appears only after a file finishes processing.
A basic auto clicker may click before the button is ready.
However, a conditional tool can wait until it finds the button. This reduces the risk of clicking too soon.
Handle More Than One Step
You can also link several actions together.
For example, a workflow might:
- Open a file.
- Wait for the app to finish loading.
- Click a confirmation button.
- Check that the action worked.
- Move to the next file.
Each step can depend on the result of the one before it.
Still, conditional clicking is not perfect. Screen layouts, image changes, and wrong settings can cause errors. That’s why testing matters.
What You Need Before Getting Started
Before creating a workflow, choose the right software and prepare your screen. If you are new to macros, our guide on how to record mouse and keyboard actions is a useful place to start.
Choose the Right Auto Clicker Mode
Auto Clicker on Steam offers different modes for different tasks.
Standard Mode works well for simple repeated clicking. You can set the click interval, mouse button, repeat count, and cursor position. It also offers a Find Image option for image-based clicking.
Advanced Mode gives you more control. It includes components for Detection, Click, Move, Interval, Repeat, Key, and Stop. You can arrange these blocks to create workflows that respond to screen changes.
For conditional automation with several steps, Advanced Mode is the better choice. You can use Detection to check for a target, Click to perform an action, and Repeat to continue checking when needed.
You can also save reusable sequences with Custom Blocks and assign macros to shortcut keys.
Plan a Simple Task
Before opening the software, decide exactly what you want it to do.
For your first test, try this:
Goal: Click an OK button when it appears in a test window.
Condition: The OK button is visible.
Action: Click the button once.
Stop rule: End the macro after the action is complete.
Start with one button and one rule. You can add more steps once the first one works.
Prepare Your Screen
Keep your test window in a stable position while setting up the macro.
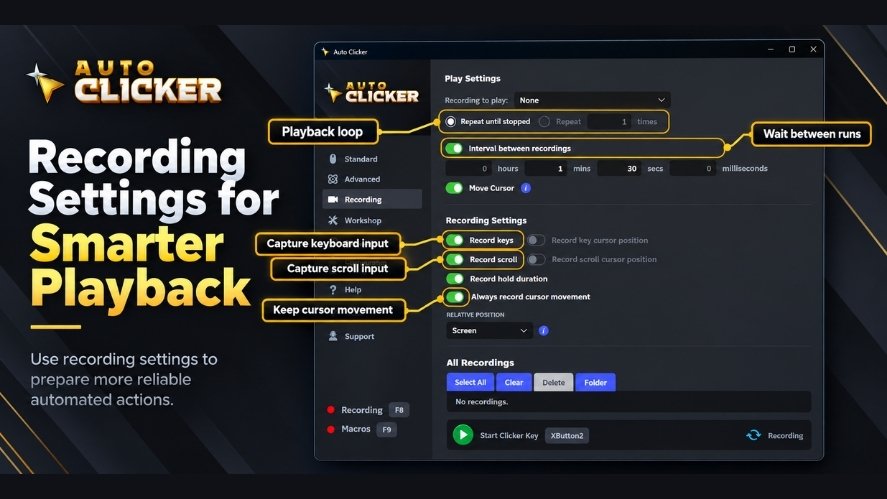
Also, check these settings:
- Screen resolution and display scaling
- Target window size and position
- Mouse click type
- Search area
- Start and stop hotkeys
- Retry limit
If you change your display settings later, you may need to update the macro.
How to Create Conditional Automation With Auto Clicker on Steam
Auto Clicker on Steam has an Advanced Mode that lets you build automated workflows using drag-and-drop components. You can combine image detection, mouse clicks, delays, and repeat loops without writing code.
For this example, we’ll create a workflow that looks for an OK button, clicks it when found, and then stops.
Step 1: Open Auto Clicker and Select Advanced Mode
Launch Auto Clicker from Steam.
Select Advanced from the left sidebar. This opens the Advanced Loop editor, where you can build workflows using different components.
At the top, you’ll find several options, including:
- Click: Add mouse-click actions.
- Move: Control cursor movement.
- Scroll: Add scrolling actions.
- Interval: Set delays between actions.
- Repeat: Repeat a group of actions.
- Detection: Check for images or screen changes.
- Key: Add keyboard inputs.
- Stop: End an automation.
You’ll also see options for managing profiles, macros, and custom blocks.
For now, we’ll focus on Detection, Click, Repeat, and Stop.
Step 2: Add a Detection Component
The Detection component helps your automation respond to changes on the screen.
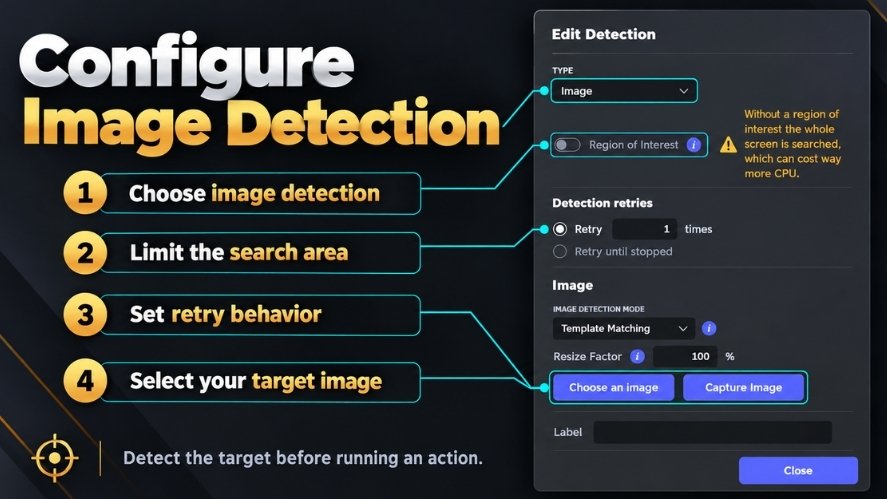
For example, you can make Auto Clicker wait for a button instead of clicking the same location over and over.
To get started:
- Find Detection in the Components section.
- Drag it into the Advanced Loop workspace.
- Open the Detection block’s settings.
- Choose image detection.
- Add or capture an image of the OK button you want to find.
Use a clear image that shows the target button without too much surrounding content.
You can also set a smaller search area to help the software focus on the correct part of the screen.
Auto Clicker supports image-based detection, so the workflow can check whether your target appears before moving to the next action.
Step 3: Set Up the Detection Condition
Next, decide what should happen when Auto Clicker finds the image.
The Detection block supports conditional branches, including If found.
For our example, the rule is simple:
If the OK button appears, click it. Otherwise, keep checking.
The workflow follows this basic logic:
Check for OK button
        |
   Button found?
      /     \
    Yes      No
     |        |
  Click OK   Wait
     |        |
    Stop   Check again
This diagram shows the intended workflow. When Auto Clicker finds the OK button, it runs the Click action. If the button is missing, the workflow can check again when you set up a retry or Repeat rule.
Next, we’ll add the Click action to the successful detection branch.
Step 4: Add a Click Action When the Image Is Found
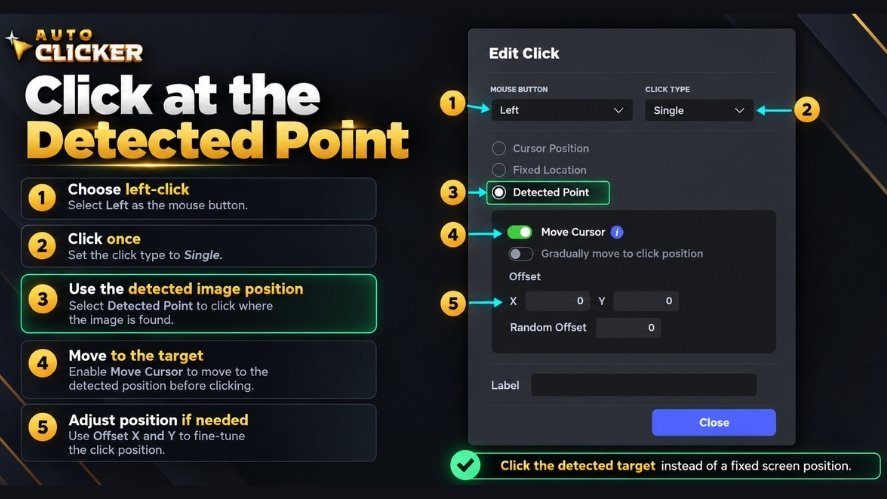
Now connect your Detection block to a mouse click.
- Find the Click component in Advanced Mode.
- Drag it into the Detection block’s If found branch.
- Open the Click block’s settings.
- Choose the left mouse button and a single click.
- Check that the click position uses the detected target.
Auto Clicker supports clicking at the detected image position. This is useful when a button moves within the search area.
For example, the button may appear slightly higher or lower depending on the app’s window size.
Instead of clicking a fixed screen position, Auto Clicker can use the location found by Detection.
Test the target position before allowing the workflow to run for a long time.
Step 5: Add Repeat and Interval Controls
Sometimes the target button takes a few seconds to appear.
Rather than checking only once, you can use a Repeat component to keep looking for it.
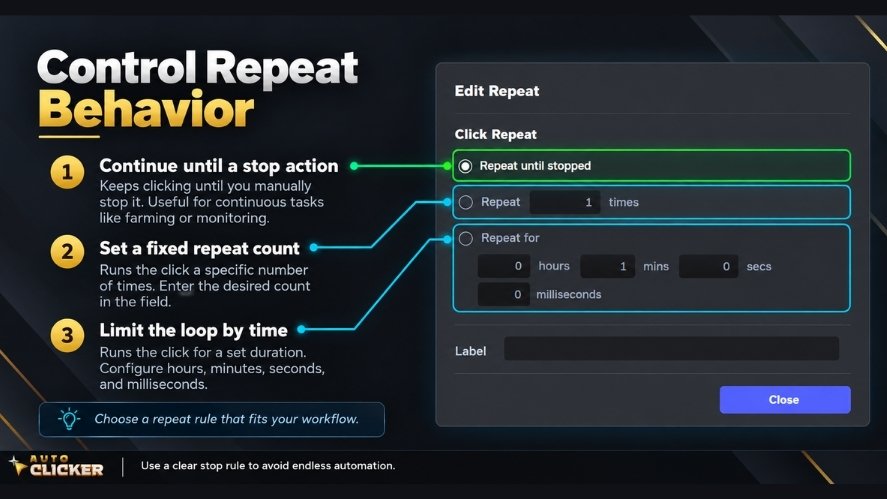
Advanced Mode lets you place actions inside repeat loops.
For a basic workflow:
- Add or open a Repeat block.
- Place the Detection component inside it.
- Set the repeat behavior to Until Stopped.
- Add an Interval component where needed to pause between checks.
- Use a Stop action when the task is complete.
For example, you might set a one-second pause between checks.
This gives the app time to update without running the detection action constantly.
You can adjust the timing later based on how quickly your target application responds.
Step 6: Add a Stop Action
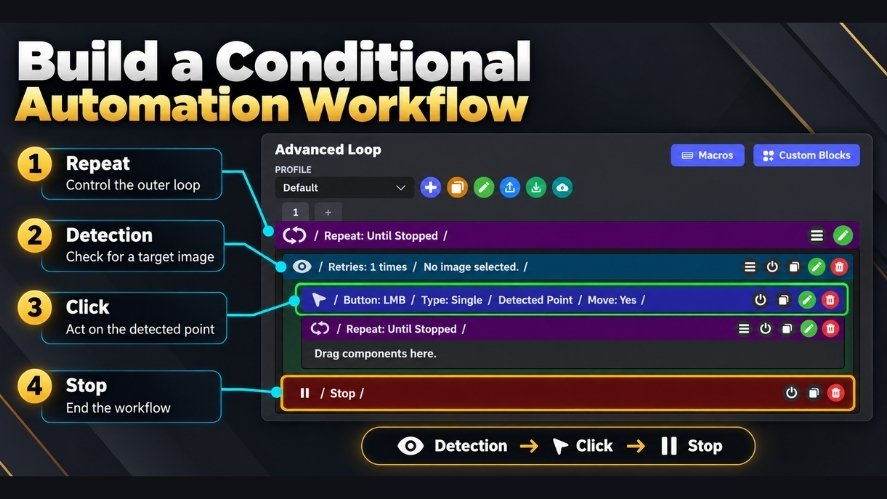
Every conditional workflow needs a clear stopping point.
Auto Clicker’s Stop component can end the automation or exit a repeat loop, depending on its settings.
For our example, add a Stop component after the Click action inside the successful detection branch.
Open its settings and choose the option that stops the entire automation.
The workflow should now search for the OK button, click it when found, and stop. If the button never appears, use a retry limit or timed repeat rule so the search doesn’t continue forever.
The intended sequence is:
- Search for the OK button.
- Click the button when it appears.
- Stop the automation.
If the button does not appear, the workflow can continue checking.
You can also use a limited repeat count or a timed repeat option to avoid running forever.
Choose a stop rule that fits the task.
Step 7: Test Your Conditional Automation
Before using your workflow for a real task, test it in a safe application.
Start with the OK button hidden.
Run the Advanced workflow using your configured start key.
Auto Clicker should search for the target without clicking elsewhere.
Next, make the button visible.
Check whether the Detection component finds the image and the Click action selects the correct position.
Finally, confirm that the Stop action ends the workflow.
If something goes wrong, check the detection image, search area, click position, and repeat settings.
Test each part before adding more actions.
Step 8: Save Your Advanced Automation Profile
Once the workflow works, save your Advanced Mode profile.
Use a clear profile name so you can find it again later.
For example:
Click OK When Detected
Auto Clicker also supports Custom Blocks, which let you organize reusable action sequences.
If you use the same group of actions in several workflows, a Custom Block can help keep your setup organized.
You can also export profiles for backup or sharing.
Before using the automation again, review its detection image, click position, and stop settings.
Small changes to the target application’s interface may affect how the workflow behaves.
Start with one simple condition. Then, as you become familiar with Advanced Mode, you can add more actions, delays, and detection rules.
How to Use Image Detection for Smarter Clicking
Image detection helps Auto Clicker find buttons, icons, or other screen elements before clicking.
In Standard Mode, you can select Find Image under Cursor Position to locate a target on your screen.
Meanwhile, Advanced Mode offers a Detection component that works with other actions, such as Click, Repeat, and Stop.
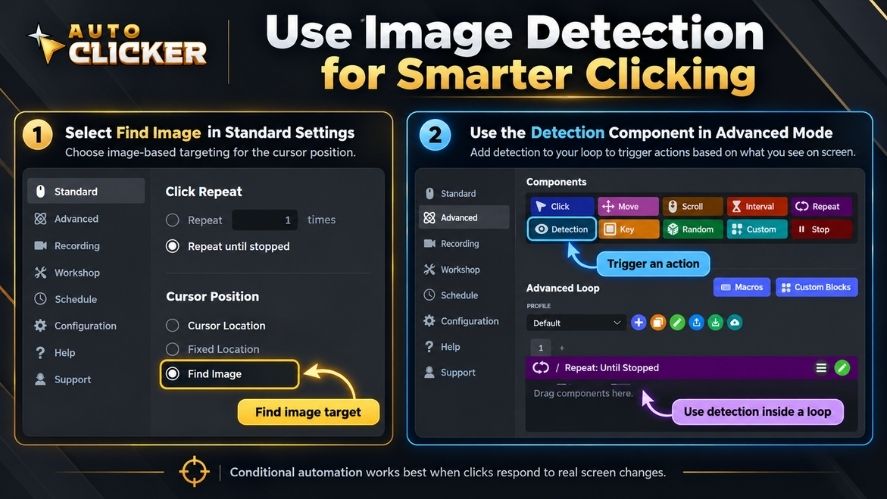
This makes Advanced Mode useful for conditional automation. For example, you can create a workflow that waits for an OK button, clicks its detected position, and stops when the task is complete.
Instead of guessing when to click, the software looks for a visual match.
How Image Search Works
Image search compares a saved picture with an area of your screen.
For example, you could save a small screenshot of a Next button.
The macro checks the screen until it finds an area that matches the reference image.
If the tool also provides the match position, you can use that location for a click.
However, image matching can fail when the button changes its color, size, text, or shape.
How to Improve Image Matching
For better results:
- Capture a clear image of the target.
- Avoid large screenshots with unrelated details.
- Keep the app’s theme and display settings the same.
- Search only where the target is expected.
- Test both successful and failed matches.
You can also adjust matching options if the software supports them.
Be careful with loose matching settings, though. A poor match could make the macro click the wrong item.
How to Use Pixel Color Detection
Pixel detection checks screen colors instead of looking for a whole image.
For example, a desktop app might use a red light to show that it is busy. Once the task is complete, the light turns green.
A pixel-based rule can respond to that color change.
Set Up a Color Detection Condition
Auto Clicker on Steam lets you detect colors using the Detection component in Advanced Mode. This is useful when an app changes the color of a button or status indicator.
For example, a status light might turn green when a task is complete. You can set Auto Clicker to look for that color before running the next action.
To set up color detection:
- Open Auto Clicker and select Advanced.
- Drag the Detection component into your workflow.
- Open the Detection settings using the green edit icon.
- Change Type from Image to the available color detection option.
- Select the target color and search area using the settings provided.
- Add a Click component to the successful detection branch.
- Test the workflow to check that it responds to the correct color.
Your workflow should follow this simple rule:
If the target color is found, click the selected location. Otherwise, wait and check again.
For better results, choose a color that is easy to identify. Also, limit the search area when possible. This can reduce unwanted matches and unnecessary screen scanning.
Color detection works best when the target color stays consistent. If the app changes its theme or display settings, you may need to update your Detection block.
Image Search vs. Pixel Detection
Which method should you use?
| Feature | Image Search | Pixel Detection |
|---|---|---|
| Checks | A saved image | A chosen color |
| Good for | Buttons and icons | Status lights |
| Needs | Reference screenshot | Color value |
| Main weakness | Visual changes | Color changes |
| Setup | More detail | Often simpler |
Use image search when the shape of a button matters.Choose pixel detection when a color change gives you enough information.
For example, an image search may be better for finding a Save button. A pixel check may be enough to detect a green status light.
Neither option works well in every situation, so test both when needed.
How to Use Multiple Conditions
Once your first workflow works, you can add more detection rules.
For example, you may want the automation to check for an error message before looking for an OK button.
Check Important Conditions First
Start by creating a Detection block for the error message.
Then, set up the next actions based on the result. If the error appears, the workflow can stop. Otherwise, it can continue to check for the OK button.
This approach helps prevent unwanted clicks when something goes wrong.
Combine Detection and Repeat Blocks
You can also use Repeat blocks to check the screen more than once.
For example, Auto Clicker can keep looking for a target image until a stop condition is met.
When using several Detection blocks, keep the actions in a clear order and test each one separately. This makes the workflow easier to manage and fix.
Schedule Your Automation
Some tasks need to run at a specific time rather than start manually. Auto Clicker’s Schedule feature lets you set when an automated task should begin and how often it should run.
To use it, open the Schedule tab and turn on Enable schedule. Next, choose your automation mode, set how often the task should run, and select a start date. Then click Create to add a scheduled time.
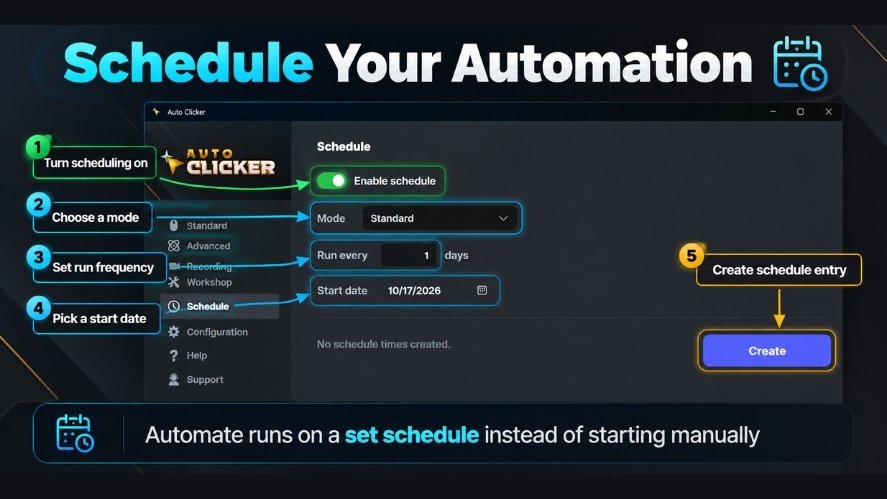
For example, you might schedule a routine clicking task to start at a certain time each day. This can be useful for repetitive desktop tasks that follow a regular schedule.
Keep in mind: Scheduling controls when an automation starts, while conditional automation controls what happens when specific conditions are met. You can use both features together when your workflow supports them.
Practical Uses for Conditional Automation
Conditional clicking can help with more than repeated button presses.
Here are a few examples.
Respond to Confirmation Dialogs
A test application may show an OK button after each completed task.
With image search, a macro can wait for the dialog and click once it appears.
Then it can check that the dialog has closed before moving on.
Handle Repetitive Desktop Tasks
Some desktop tools require you to open a file, wait for processing, and confirm the result. For simpler routines, you can also combine auto scrolling with clicks and pauses without adding conditional rules.
You can use conditions to connect these steps.
For example, the macro might wait for a Done message before moving to the next file.
This can be useful for routine work in approved applications.
Test Software Interfaces
Conditional automation can help test how a program responds to user actions.
For example, a test can wait for a dialog, click a button, and check whether the next screen appears.
For larger test projects, dedicated testing tools may be more reliable than screen-based clicks.
Support Permitted Game Tasks
Some users explore auto clickers for single-player games, accessibility, or private testing.
However, game rules differ. Some games ban automated inputs, even when the software works.
Always check the game’s rules before using macros or auto clickers.
Explore Community Setups in the Workshop
Auto Clicker’s Workshop lets you explore automation setups shared by other users. Open the Workshop tab to browse available projects or use the search bar to find specific setups. You can also filter results by screen resolution and select Details to review a project before using it.
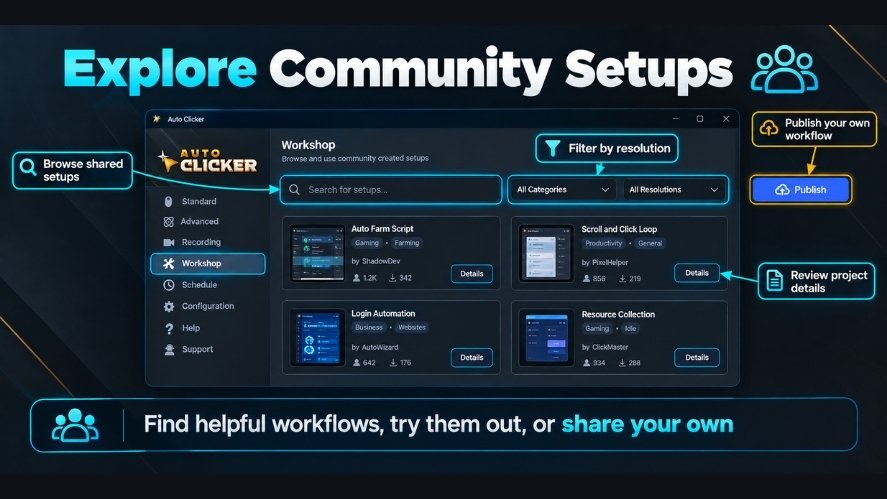
If you’ve created a useful automation workflow, the Publish option lets you share it with the community. Before using any shared setup, check its actions and settings to make sure they match your needs.
Common Conditional Auto Clicker Problems and Fixes
Even a well-built macro can fail if the app changes.
The table below covers common issues and what to try first.
| Problem | Possible Cause | What to Try |
|---|---|---|
| Image not found | Saved image no longer matches | Capture a new image |
| Trigger never runs | Wrong condition or search area | Test the search on its own |
| Click misses target | Wrong coordinates | Use the detected image position |
| Macro clicks too early | App is still loading | Wait for a clear ready signal |
| Macro runs too slowly | Long delays or broad searches | Reduce the search area |
| Wrong action runs | Rules overlap | Put conditions in a clear order |
| Loop never ends | No working stop rule | Add a retry limit |
| Wrong app gets clicked | Window focus changed | Check the active window |
What If Image Detection Keeps Failing?
First, check the reference image and search area.
If you recently changed your screen resolution, display scaling, or app theme, capture a new image.
Also, make sure the target is visible when the search runs.
If the search works but the click misses, check how the software stores the detected coordinates.
What If the Macro Clicks Too Fast?
Add a short pause after the click, then wait for the screen to change.
Avoid using click speed alone to make the workflow faster.
The app needs enough time to respond before the next action.
What If the Macro Will Not Stop?
Check the loop and repeat settings.
Make sure the search has a clear limit or success rule.
You should also test the software’s stop hotkey before running a long macro.
Best Practices for Reliable Automation
A conditional workflow should be easy to understand and safe to stop.
Follow these habits as you build more macros.
Start Small
Begin with one trigger and one action.
Once that works, add another condition or a repeat rule.
This makes testing much easier.
Keep Screen Settings Consistent
Image and color detection depend on what appears on your screen.
If you move an application window, change your display resolution, or switch themes, Auto Clicker may have trouble finding the correct target.
To avoid problems, keep your screen settings consistent and update your Detection component when needed.
Before making major changes, consider saving and restoring your Auto Clicker configuration data. The Export feature lets you back up your settings, while Import helps you restore previously saved data.
This gives you a way to return to an earlier setup if your changes cause problems.
Confirm Important Actions
A successful click does not always mean a task is complete.
Whenever possible, check for a success message or another clear result before continuing.
Avoid Endless Loops
Set a maximum number of retries or a time limit.
For example, if a button does not appear after several checks, stop the macro and review the problem.
Keep a Manual Stop Option
Make sure you can stop the workflow without relying on the mouse alone.
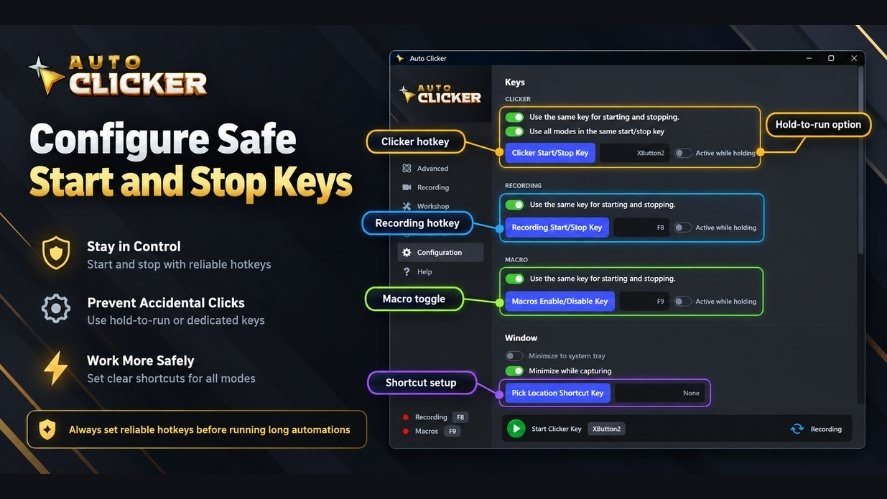
Use a stop hotkey or another supported control, and test it before starting.
Follow App Rules
Use automation only where you have permission.
Also, avoid testing macros with real payments, important files, or sensitive data. Use a test environment first.
Frequently Asked Questions
What Is Conditional Automation in an Auto Clicker?
Conditional automation lets a tool perform clicks based on rules instead of a fixed timer. For example, it can wait for a button to appear before clicking.
Can an Auto Clicker Click When an Image Appears?
Yes. Auto Clicker on Steam supports image detection through its Detection component in Advanced Mode.
Can I Create Conditional Automation Without Coding?
Yes. Auto Clicker on Steam has an Advanced Mode with drag-and-drop components. You can combine Detection, Click, Repeat, and Stop actions without writing code.
Does Every Auto Clicker Support Conditional Rules?
No. Many basic auto clickers only repeat clicks at set intervals. Check the software’s features before choosing a tool.
What Is Better: Image Search or Pixel Detection?
Image search is often better for finding buttons and icons. Pixel detection works well for simple color changes, such as a status light turning green.
Can I Use More Than One Condition?
Yes. Advanced Mode lets you combine multiple Detection blocks and other actions in one workflow. For example, you can check for an error message before looking for a confirmation button.
Why Does My Conditional Auto Clicker Miss Buttons?
The saved image may no longer match, the search area may be wrong, or the button may have moved. Start by testing the image search on its own.
Can Conditional Auto Clickers Work With Games?
Some tools can send automated inputs to games, but many games restrict this behavior. Check the game’s rules and use automation only when allowed.
Conclusion
Conditional automation gives you more control over how an auto clicker works.
Instead of clicking on a fixed timer, you can set rules that wait for buttons, check colors, and respond to screen changes.
The best way to start is with a simple task. Choose a tool that supports conditions, create one image search, and connect it to a click.
Then test what happens when the button appears, disappears, or never shows up.
As you gain experience, you can add more conditions, loops, and keyboard actions.
Above all, keep your rules clear and include a way to stop the macro. A simple, well-tested workflow is often more useful than a complex one.
Want to explore more? Check out our other Auto Clicker guides to learn how to record mouse actions, build macros, and automate everyday tasks.

Auto Clicker App: How Customizable Profiles Enhance Automation

How to Auto Farm in Games Using Auto Clicker on Steam

How to Download Auto Clicker on Steam: Step-by-Step Guide
About The Author
