
Mouse and Keyboard Automation Using Auto Clicker on Steam
A click is not always the end of a task. You might click a button, wait for a menu, and then press Enter. Doing that once is easy. Doing it 50 times gets old fast. Mouse and keyboard automation lets you put those steps into one routine. You choose which inputs to send, when to send them, and when to stop.
Auto Clicker by Playsaurus, available on Steam, has an Advanced Mode that can run both mouse clicks and key presses. This guide shows you how to build a short sequence, test it safely, and fix the most common issues. You do not need to write code.
What Is Mouse and Keyboard Automation?
Mouse and keyboard automation uses software to carry out actions you would usually do by hand. Those actions may include a left-click, a key press, or a short wait.
For example, think of a test app with an Open button. Clicking it brings up a small dialog. Pressing Enter closes that dialog. A simple sequence can run both steps in order.
Mouse clicks and automated keystrokes
Mouse click automation controls where and how a click happens. A tool may click at the pointer’s current spot or at a fixed point on the screen.
Automated keystrokes send keys such as Enter, Tab, or Escape. They can also help with tasks that use shortcuts. But the right window must be active. If another app has focus, the key may go there instead.
When a tool links these actions, the result is a mouse and keyboard macro. The key is getting the order right. A key press that comes too soon may do nothing or reach the wrong window.
Why Use Auto Clicker on Steam?
Auto Clicker on Steam has three modes. Each one suits a different job.
| Mode | What it does | Best use |
|---|---|---|
| Standard Mode | Repeats mouse clicks with set timing and a target | Clicking one button many times |
| Advanced Mode | Links Click, Key, Interval, Repeat, and other action blocks | Combining mouse and keyboard inputs |
| Recording Mode | Records clicks, key presses, and delays for replay | Repeating steps that are easier to show |
For this guide, use Advanced Mode. It has a drag-and-drop editor, so you can place each action where it belongs. The Key action is part of the app, not an extra tool you need to install.
If you only need repeated clicks, start with the basic Auto Clicker setup guide. A full macro would add work you do not need.
Before You Start: Plan One Safe Test
Pick a task with a clear start and finish. A good first test is a demo window with a button that opens a harmless dialog. Pressing Enter should close the dialog and return you to the first screen.
Try the steps by hand first:
- Click Open in the test app.
- Wait until the dialog appears.
- Press Enter to close it.
- Check that the app returns to the first screen.
If Enter does not close the dialog when you press it by hand, choose a different test. A macro cannot fix a key that the app does not use.
Keep the test window in one place. Also, check the start and stop key in Auto Clicker’s settings before you run anything. Avoid real forms, payments, file deletion, or other tasks that could cause harm if they run twice.
How to Set Up Mouse and Keyboard Automation in Advanced Mode
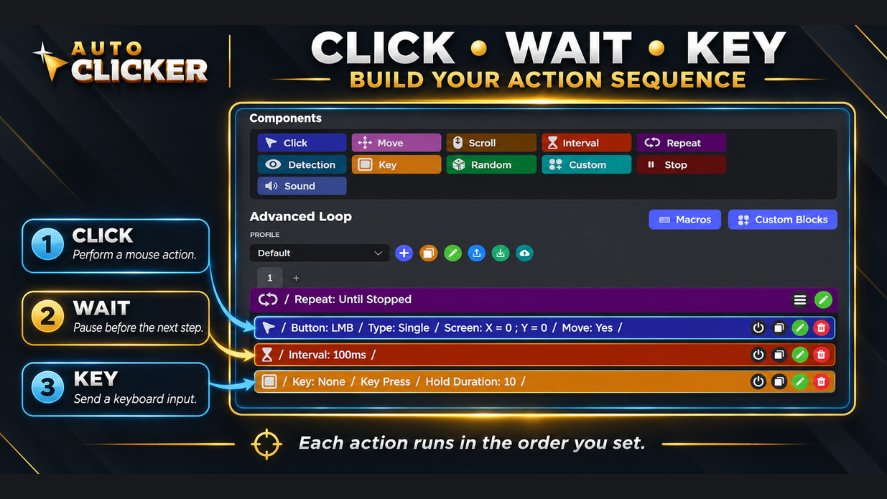
Let’s turn that test into a working routine. The plan is simple: Click → Wait → Press Enter. Once it works, you can repeat the full sequence.
Step 1: Open Advanced Mode
Launch Auto Clicker from your Steam Library. Select Advanced Mode.
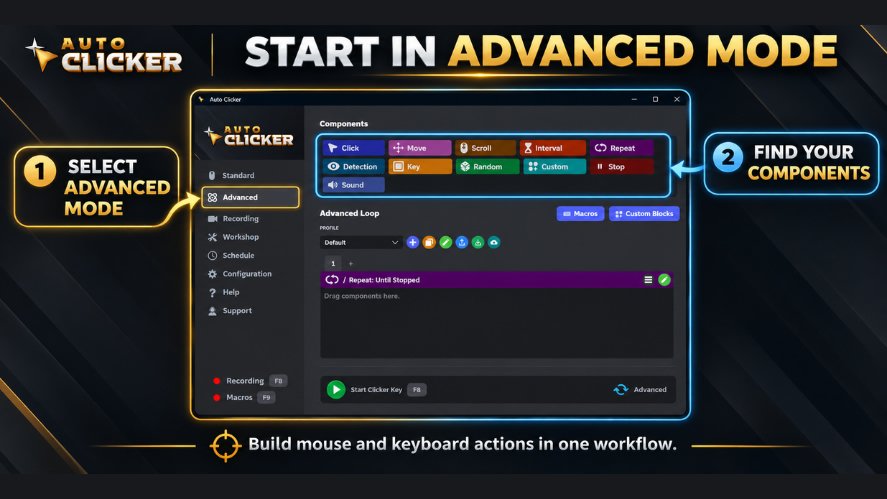
You will see an editor where you can drag actions into a workflow. Look for these blocks:
- Click for the mouse action.
- Interval for the wait.
- Key for the keyboard action.
- Repeat to run the whole sequence more than once.
You only need the first three to build your test.
Step 2: Set up the mouse click
Drag a Click block into the workflow. Open its settings.
Choose a left mouse button and a single click. Then set the click location to the Open button in your test window.
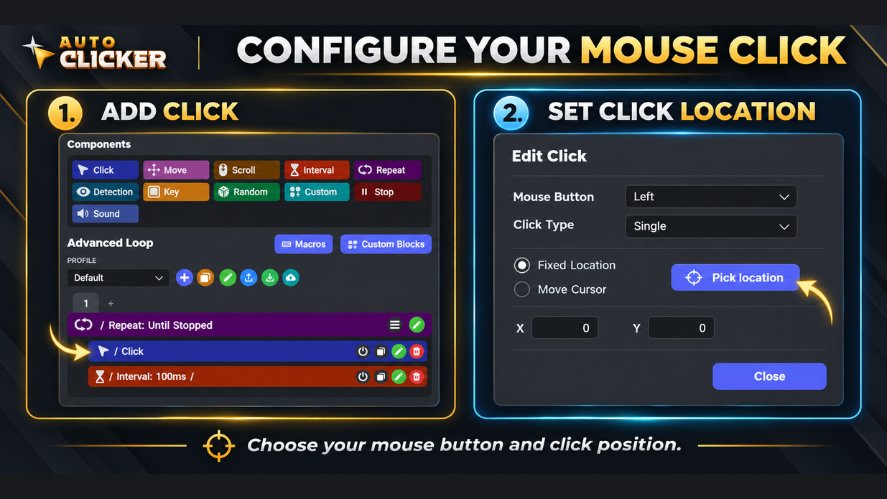
A fixed location works well if the window stays put. A cursor-based location can work too, but you must place the pointer on the right target before you start. If the app window moves, check the location again.
Run a single click test if you can. Make sure it opens the dialog you expect.
Step 3: Add a pause after the click
Place an Interval block right after Click. Set a delay of one second for your first test.
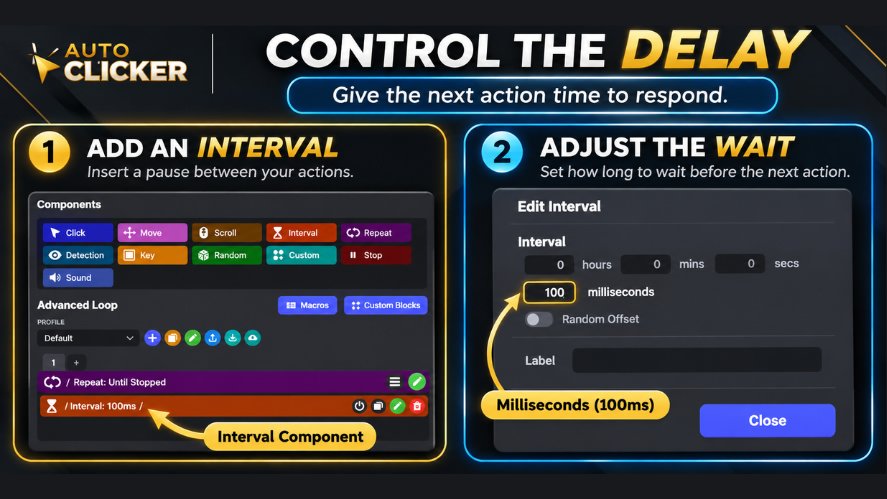
Why wait? The dialog may take a moment to appear. If Enter fires too soon, the test app may miss it.
One second is a safe starting point for this example, not a required setting. You can try a shorter wait after you see that the sequence works.
Step 4: Add the keyboard input
Drag a Key block below Interval. Open its settings and set the action to press Enter.
Your workflow should now run in this order:
| Order | Block | What happens |
|---|---|---|
| 1 | Click | Opens the test dialog |
| 2 | Interval: 1 second | Gives the dialog time to appear |
| 3 | Key: Enter | Closes or confirms the dialog, if Enter is its active control |
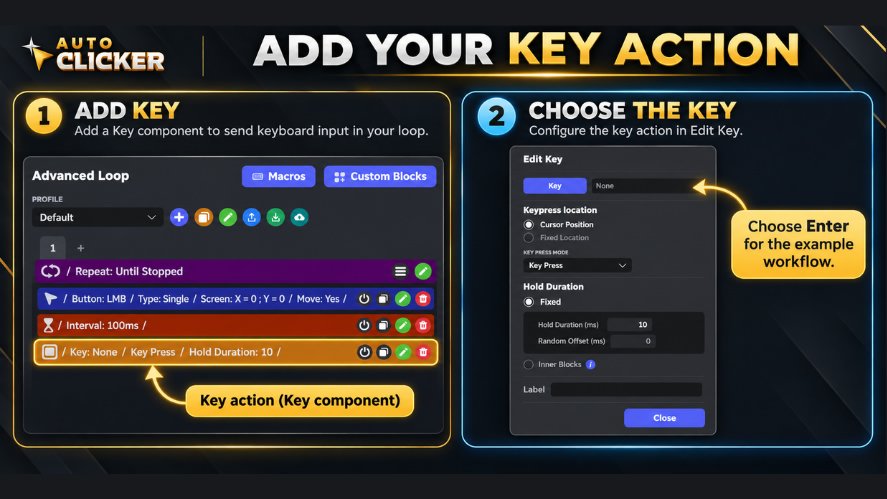
Make sure the test app has focus when the run starts. Also, check what Enter does in that app. Never use a live form or payment screen for this test.
Step 5: Test the sequence once
Start the workflow and watch all three actions. The official AutoClicker documentation lists F6 as the default start and stop key. Your assigned key may be different if you changed it, so check the Configuration settings or the control shown in your app.
- Did the click open the right dialog?
- Did Enter close it?
- Did the app return to its starting screen?
If any step fails, stop and fix that step before you add more. You do not need to rebuild the whole routine.
Step 6: Repeat the whole routine
Once the single run works, add a Repeat block. Put Click, Interval, and Key inside Repeat, in that order. Set the block to run three times.
This detail matters: if Key sits outside Repeat, it may run only once. If the pause sits outside, later key presses may arrive too soon.
Try all three cycles. Watch for a dialog that fails to close or a click that hits the wrong place. If that happens, stop the run, fix the issue, and test again.
You can learn more about loop settings in the guide to repeating actions with Auto Clicker.
Another Option: Record Your Mouse and Keyboard Actions
You do not have to build every action by hand. If a task has many steps, Recording Mode may be faster.
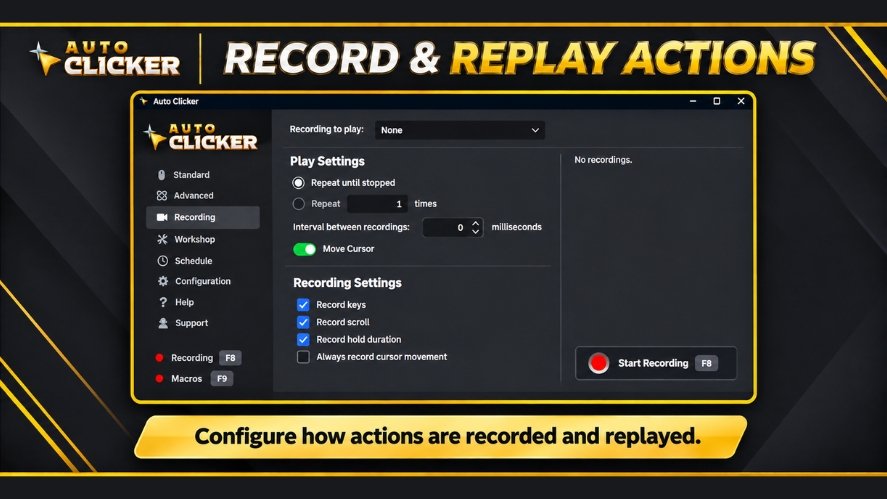
Auto Clicker can capture mouse clicks, key presses, movement, and the time between actions. The official guide describes this basic process:
- Open Recording Mode.
- Press F8 to start a recording, unless you changed the key.
- Carry out a short task in a safe test window.
- Press F8 again to stop.
- Save the recording and play it back once.
Review the result before you repeat it. A recording can capture a wrong click or a long pause along with the steps you meant to keep.
If you want to clean up a recorded routine, see the full guide on how to record mouse and keyboard actions.
Where Can You Use Mouse and Keyboard Automation?
A combined routine is most useful when a task has steps that must happen in order.
| Task | Example input sequence | What to watch for |
|---|---|---|
| Test a dialog | Click Open → Wait → Enter | The dialog must be ready before Enter |
| Test keyboard focus | Click a sample field → Tab → Enter | Tab must move to the right control |
| Repeat a demo | Click a menu → Press a key → Close it | The window must return to its start state |
| Use an allowed game feature | Click an action → Press an allowed key | Check the game’s automation rules first |
In a desktop test, a fixed sequence can save time and give you the same steps on each run. It can also help you spot a button that works on one try but fails on another.
Games need more care. A game being sold on Steam does not mean it allows macros. Check that game’s rules before you use automation, especially in online or competitive play.
Tips for More Reliable Input Automation
A good macro is not always the fastest one. It is the one that does the right thing and stops when it should.
Start with a short run. Test one cycle before three. Test three before a longer loop. This makes errors easier to find.
Leave time for the screen to change. Use an Interval block after a click that opens a menu or dialog. If the wait is too short, add more time. A fixed wait cannot tell whether an app has finished loading.
Keep the right window active. A pop-up or a switch to another app can change where keys go. Stay with the test while it runs.
Know your stop key. Test it before you use long loops. Check your own settings instead of assuming the default key is still in place.
Use screen checks when timing is not enough. If a button appears at different times, a fixed wait may fail. Advanced Mode also has a Detection action. Our conditional automation guide covers that option in detail.
Troubleshooting Mouse and Keyboard Automation
If the routine does not work, start with the first step that goes wrong. The checks below solve many basic setup issues.
| Problem | What to check | What to try |
|---|---|---|
| Click works, but the key does not | Is the Key block present? Does the right window have focus? | Try Enter by hand in the test app, then test the Key block alone |
| Enter runs before the dialog appears | The pause may be too short | Add a longer Interval after Click |
| Click lands in the wrong place | The window may have moved | Check the target location and keep the window in place |
| Only the click repeats | The Key block may be outside Repeat | Put all three action blocks inside Repeat |
| Steps stop working after you switch apps | Another window may have focus | Keep the target app active during the test |
| The routine misses inputs | The app may not be ready for each step | Slow the sequence and test one action at a time |
ProblemWhat to checkWhat to tryClick works, but the key does notIs the Key block present?
If a key still fails in one app but works in another, the target app may handle input in a different way. On Windows, security settings can also limit some forms of simulated input. Do not bypass those controls. Check the app’s rules and supported input methods instead.
Frequently Asked Questions
Can Auto Clicker on Steam press keyboard keys as well as click?
Yes. Playsaurus’s Auto Clicker includes a Key action in Advanced Mode. You can place it after a Click or Interval block to make a combined routine. The app also has Recording Mode for mouse and keyboard actions.
Can I automate mouse movement too?
Advanced Mode includes a Move action. You can use it when the pointer needs to travel to another spot before a click. A basic fixed-point click may be enough if the target never moves.
How do I add a delay between a click and a key press?
Place an Interval block between Click and Key. Start with a one-second wait in a test app, then adjust it based on how fast the screen changes. A wait that is too short can cause missed inputs.
Can I repeat both actions, not just the click?
Yes. Place the Click and Key blocks, along with any waits, inside the same Repeat block. Start with a low repeat count. If one block is outside the loop, it may not run on each pass.
Do I need to know how to code?
No. Advanced Mode uses drag-and-drop blocks. You can also use Recording Mode to capture a short task and play it back. Start with a small routine so it is easy to test.
Is mouse and keyboard automation allowed in Steam games?
That depends on the game. Some allow certain macros, while others ban automated input. Read the game’s rules before you use a macro. This is especially important for online and competitive games.
Conclusion
Mouse and keyboard automation works best when each action has a clear purpose. Start with one click, add a short wait, then send a key press. Test it once before you place the steps inside a loop.
With Auto Clicker on Steam, Advanced Mode lets you build that routine without code. Recording Mode is another choice if you would rather show the app what to do. Keep the target window in focus, check your stop key, and use short tests until the steps work as planned.

Best QA Tools 2026: What Every Software Team Should Be Using

Auto Clicker Fix: Common Issues and Solutions

Is There a Mouse with a Built-in Auto Clicker?
About The Author
