
Data Import and Export in Auto Clicker
Data Import and Export in Auto Clicker gives users a practical way to save personalized configuration data, restore a previous setup, and organize different configurations without rebuilding everything manually. If you have spent time adjusting an automatic clicker to suit a particular workflow, keeping a reusable copy of those settings can make future setup much easier.
Auto Clicker configurations can become personalized over time. You might adjust options for a particular task, experiment with different behaviors, or maintain separate setups for different activities. Recreating those settings manually every time can be inconvenient, especially when you already have a configuration that works the way you want.
That is where the Data controls in Configuration become useful.
The Data section provides three main options:
- Export
- Import
- Clear
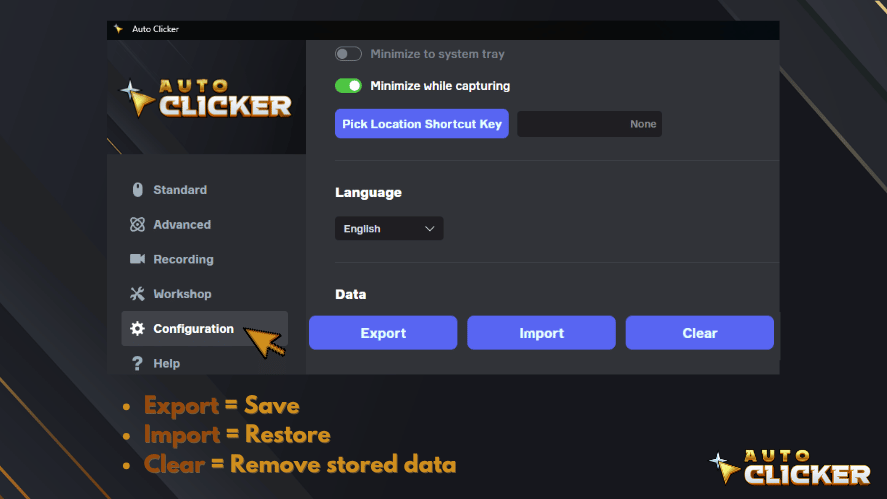
Export allows you to save your current Auto Clicker data as a JSON configuration file. Import provides a way to load previously exported data back into the application. Clear, meanwhile, is intended for clearing stored data rather than creating or restoring a saved copy.
In this Auto CLicker Guide, you will learn how these controls differ, how to export Auto Clicker information to a JSON file such as autoclicker-data.json, how to import saved configuration data later, and how to organize multiple exports so they remain easy to identify.
Whether you use a mouse clicker occasionally or rely on automated mouse clicks as part of a repeated workflow, understanding these controls can help you manage your configuration more efficiently.
What Is Data Import and Export in Auto Clicker?
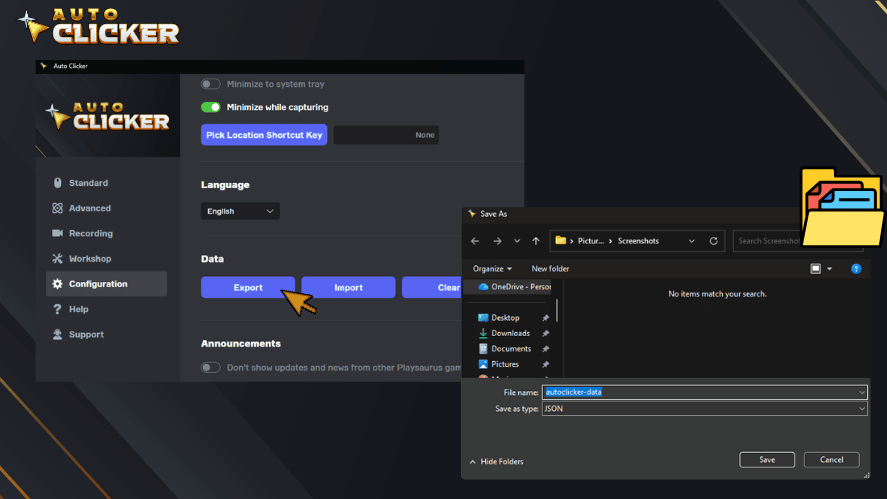
The Data Import and Export feature is a configuration-management tool designed to make saving and restoring Auto Clicker data more convenient.
Instead of treating your current configuration as something that has to remain inside the application indefinitely, Export gives you a way to create a separate configuration file. That file can then be retained and selected later through Import when you want to load the saved data again.
This can be especially useful when your setup contains settings you do not want to recreate manually.
What the Data Import and Export Feature Is For
The Data Import and Export controls are found in the Data section under Auto Clicker Configuration. Their purpose is straightforward: they give users options for saving, loading, or clearing stored configuration data.
A few common situations illustrate why this matters.
1. Saving a copy of an Auto Clicker setup
Imagine that you have finished configuring Auto Clicker exactly the way you want. Before changing those settings, you can export the current configuration.
The resulting file acts as a saved copy that you can retain for later use.
This is useful whether you are experimenting with auto click speed settings, changing how you use an auto click mouse workflow, or simply want a known configuration available before making additional adjustments.
2. Restoring previously saved configuration data
Suppose you change several settings and later decide that your old configuration was better.
If you previously exported that configuration, Import gives you a straightforward way to select the saved JSON file and load its data back into Auto Clicker.
That can be much faster than trying to remember every setting you previously used.
3. Moving a configuration when appropriate
An exported file separates the saved configuration from the current application state. Where your particular environment supports the same configuration data, retaining that file gives you a portable copy that can be selected through the application’s Import control.
Because compatibility can depend on the particular Auto Clicker version or environment, use exports created for the applicable Auto Clicker configuration rather than assuming that any unrelated JSON file will work.
4. Keeping different saved configurations
Users who switch between workflows can maintain different Auto Clicker configurations instead of constantly rebuilding their settings.
For example, you could create your own filenames such as:
- autoclicker-gaming.json
- autoclicker-work.json
- autoclicker-default.json
These are organizational examples rather than filenames automatically assigned by Auto Clicker.
5. Avoiding manual setup repetition
One of the biggest advantages of configuration export is simple convenience.
Whether you found Auto Clicker while researching good auto clickers, comparing the best auto clickers, or learning how to use auto clicker software, it is easy to overlook configuration management until you have spent time customizing an application.
Once your settings become valuable to you, saving them is generally easier than remembering and reproducing them later.
Understanding the Data Import and Export JSON File
When you use Export, Auto Clicker saves its data in a JSON configuration file.
In the supplied Save As example, the file is named:
autoclicker-data.json
JSON stands for JavaScript Object Notation. Despite the technical name, you do not need programming knowledge to use the Import and Export feature.
JSON is simply a structured text format that software can use to organize and store information. In this case, Auto Clicker uses the file as a container for exported configuration data.
For normal backup and restoration purposes, users generally do not need to open or edit the contents manually. The safer workflow is simply:
Export the file → keep it somewhere safe → select it through Import when needed
Unless manual modification is officially supported for the specific application and version you are using, there is little reason to alter the JSON yourself.
How to Export Data Import and Export Information From Auto Clicker
Exporting is the first half of the Data Import and Export workflow. It creates a saved JSON file containing the Auto Clicker data available through the Data control.
The process is designed to be simple.
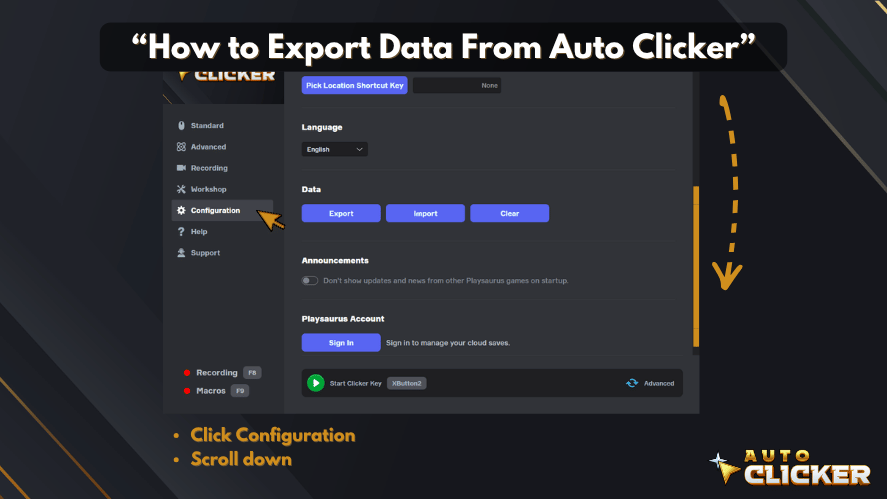
Step 1: Open Auto Clicker Configuration for Data Import and Export
Launch Auto Clicker and look at the navigation menu on the left side of the application.
Select Configuration.
This opens the area where configuration-related options are available.
If you are new to the application and arrived after an auto clicker download, spend a moment familiarizing yourself with the Configuration screen before changing or clearing anything. Knowing where your current settings live makes it easier to understand what you are saving.
Step 2: Find the Data Import and Export Section
On the Configuration page, scroll down until you reach the Data heading.
You should see three controls:
- Export
- Import
- Clear
Each performs a different task.
Export saves data. Import loads exported data. Clear removes stored data rather than creating an export.
This distinction matters because clicking Clear is not the same as creating a backup.
Step 3: Select Export for Data Import and Export
Click Export.
This begins the process of saving the current Auto Clicker data into a separate configuration file.
Your operating system should then present the file-saving interface associated with the export process.
The exact visual appearance of the Save As window may differ depending on your operating system, but the basic purpose is the same: choose where the file should be stored and identify it with a filename.
Step 4: Choose Where to Save the Data Import and Export File
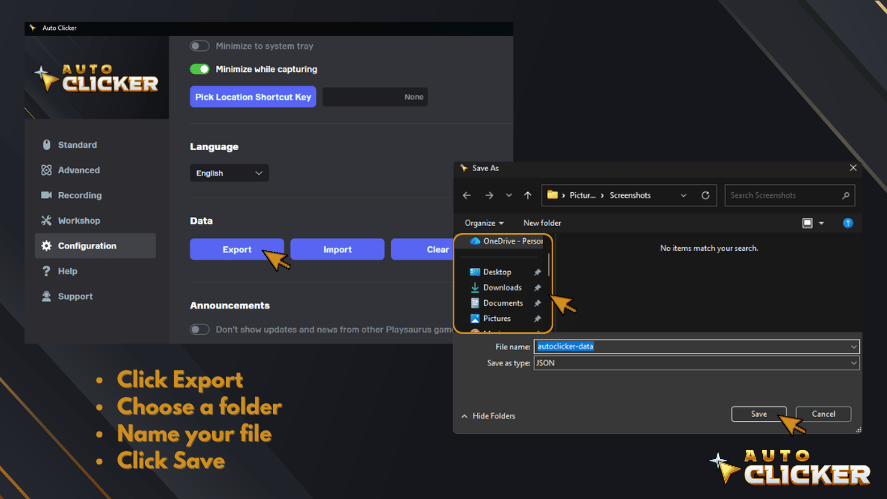
In the Save As window, navigate to a folder that you will be able to find later.
For example, you might create a dedicated folder such as:
Documents/Auto Clicker Backups/
Keeping exports together is especially useful if you plan to save more than one configuration.
The supplied example uses:
autoclicker-data.json
You can also use a more descriptive filename when appropriate.
For example:
- autoclicker-default.json
- autoclicker-work.json
- autoclicker-gaming.json
- autoclicker-2026-08-09.json
- autoclicker-before-changes.json
A descriptive name can tell you what the file contains without requiring you to inspect it.
Step 5: Save the Data Import and Export JSON File
Click Save to complete the export.
Once the file has been saved, remember where you placed it. The file becomes useful later only if you can locate it when you want to import that configuration.
A simple organizational habit can prevent a lot of confusion: keep important exported files in one dedicated folder and use filenames that describe either their purpose or the date they were created.
For example, if you regularly test different auto click configurations, names such as work-setup-2026-08.json and gaming-setup-2026-08.json are much easier to recognize than a folder containing several vaguely named files.
How to Import Data Into Auto Clicker
Import is the counterpart to Export in the Data Import and Export workflow.
While Export saves the current data to a JSON file, Import lets you select previously exported Auto Clicker data and load it back into the application.
This is what makes the exported file useful as a reusable configuration.
Step 1: Return to Data Import and Export in Configuration
Open Auto Clicker and select Configuration from the left navigation menu.
Scroll to the Data section again.
You should see the same three controls:
- Export
- Import
- Clear
Before importing, it is useful to know which saved file you intend to restore, particularly if you maintain multiple configurations.
Step 2: Click Import in the Data Import and Export Section
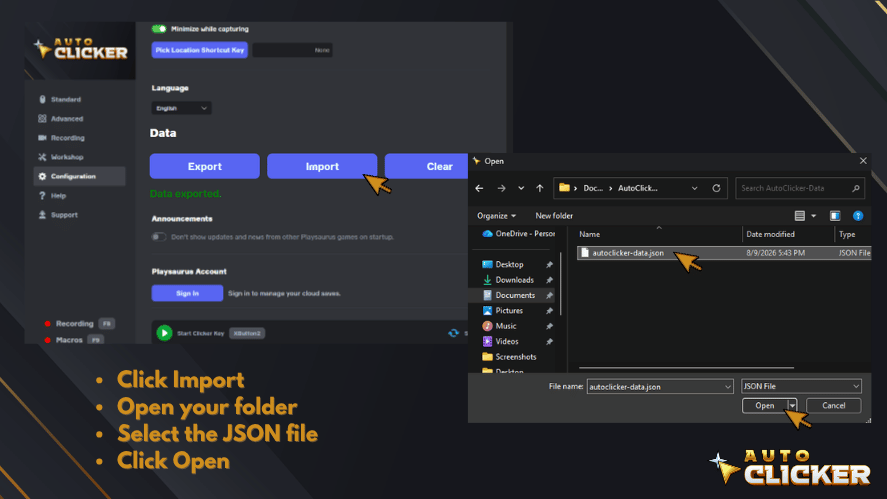
Select Import.
This begins the file-selection process for previously exported Auto Clicker configuration data.
Import should be used with a file you recognize as an Auto Clicker export rather than an arbitrary .json file from another program.
The .json extension only describes the general file format. Many unrelated applications use JSON files, so the fact that a file ends in .json does not automatically make it an Auto Clicker configuration.
Step 3: Select Your Saved Auto Clicker JSON File
Browse to the folder where you saved your exported configuration.
For example, you might select:
autoclicker-data.json
Or, if you use descriptive backups:
autoclicker-work.json
Choose the file containing the configuration you want to load.
If you maintain several exports, check the filename and location carefully before completing the selection.
Step 4: Complete the Data Import and Export Import Process
Complete the operating system’s file-selection action so Auto Clicker can load the selected exported data.
After the import has completed, review the relevant Auto Clicker settings.
This verification step is worthwhile because it confirms that you selected the intended file and restored the configuration you expected.
For example, if you maintain separate configurations for different workflows, checking your settings immediately can prevent you from accidentally proceeding with the wrong setup.
A simple import routine therefore looks like this:
Configuration → Data → Import → Select saved JSON → Complete selection → Verify settings
When Should You Use Data Import and Export in Auto Clicker?
The value of Data Import and Export becomes clearer when you look at real-world scenarios.
You do not necessarily need to export after every small adjustment. Instead, the feature is most useful when the current configuration has value that you may want to recover later.
Backing Up Your Auto Clicker Configuration With Data Import and Export
A backup is one of the simplest reasons to use Export.
If you have spent time adjusting an autoclicker for a specific purpose, saving that configuration gives you a point you can return to later.
This is particularly useful before:
- Testing extensive configuration changes
- Experimenting with different clicking behavior
- Adjusting multiple settings at once
- Using Clear
- Replacing a setup you know already works
- Maintaining different task-specific configurations
Think of the exported JSON file as a saved configuration checkpoint.
It is easier to experiment when you know that the previous setup has been retained separately.
Restoring a Previous Setup With Data Import and Export
Settings sometimes evolve through trial and error.
You may change a value because you think it will improve a workflow, only to discover that your previous setup suited the task better.
If you exported the old configuration first, you can use Import instead of trying to reverse every change manually.
This is particularly convenient when several settings have been adjusted.
Someone experimenting with auto click speed, for example, may be able to remember a single previous speed value. But once multiple configuration options have changed, recreating a former setup from memory becomes increasingly inconvenient.
Exporting beforehand removes much of that guesswork.
Managing Different Auto Clicker Setups With Data Import and Export
Another practical use is maintaining different saved configurations.
You might have one setup associated with one workflow and another for a separate task.
Instead of repeatedly changing everything manually, you can keep clearly labeled exported files.
For example:
Again, these are user-created organizational examples, not guaranteed default filenames generated by the application.
This approach can be particularly useful for people who regularly use automated clicking tools and want to keep their settings organized.
What Does Clear Data Do in Auto Clicker?
The Data area contains Clear alongside Export and Import, so understanding the difference is important.
Clear should not be confused with Export.
Export preserves configuration data in a file. Import loads previously exported data. Clear removes stored data rather than creating a restorable export.
Data Import and Export vs Clear
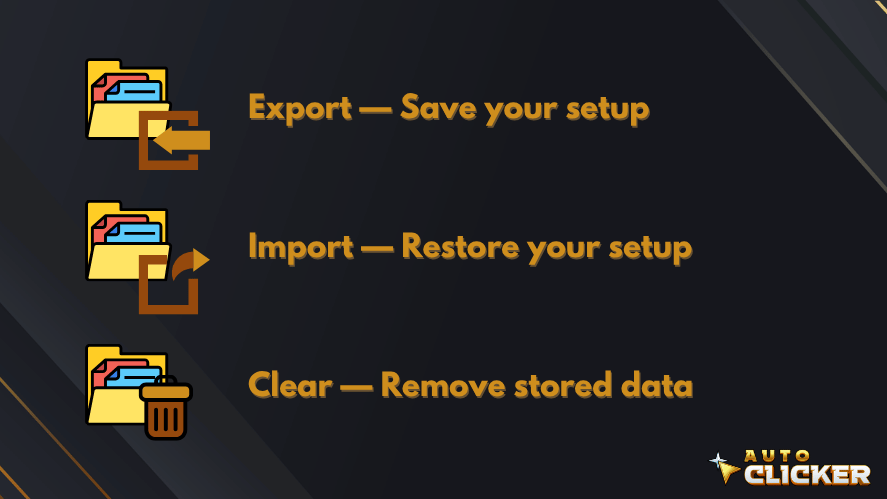
The three controls can be summarized simply:
ControlPurposeExportSaves Auto Clicker data to a fileImportLoads previously exported Auto Clicker dataClearClears stored data rather than creating or restoring an export
The key distinction is preservation.
Export creates a separate file that you can keep. Clear does not serve the same backup purpose.
Because the supplied information does not establish the exact confirmation behavior or every consequence of Clear in all versions, it is best not to assume that a particular warning screen will always appear.
Treat Clear as an action you should use deliberately.
Export Data Import and Export Files Before Clearing Important Configurations
If your existing configuration matters to you, create an export before using Clear.
That gives you a separate JSON file to retain in case you want the previous configuration again.
A sensible sequence is:
- Review the current configuration.
- Select Export.
- Save the JSON file somewhere easy to find.
- Confirm that the file exists.
- Only then proceed with Clear if clearing the data is your intention.
This is a small precaution that can save considerable effort later.
Tips for Managing Data Import and Export Configuration Files
Exporting a configuration is easy. Keeping several exports organized requires a little more thought.
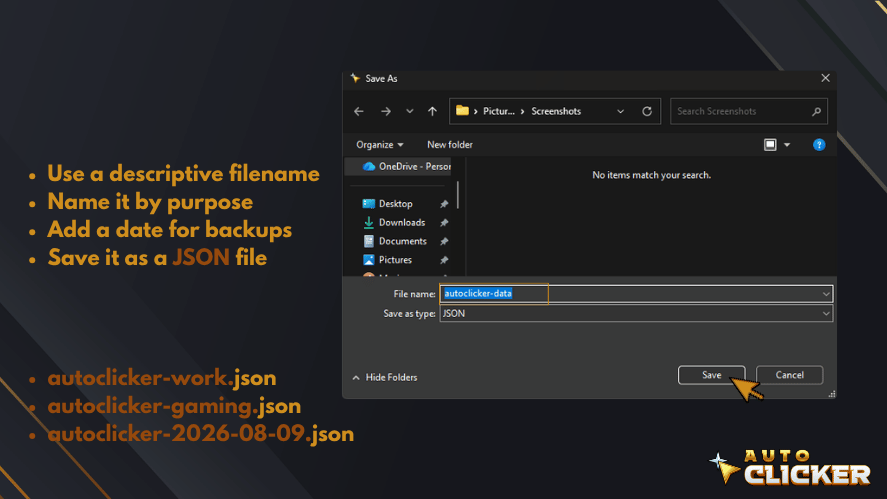
Fortunately, a few simple habits are usually enough.
1. Store JSON exports somewhere easy to find
Avoid saving important files in random directories unless you know you will remember them.
A dedicated folder is often simplest:
Documents/Auto Clicker Backups/
You can also create subfolders if you have many configurations.
2. Give different configurations descriptive filenames
A filename should help you identify the configuration before you import it.
Compare these:
data1.json
and:
autoclicker-work-default.json
The second provides much more useful context.
3. Include dates in filenames when maintaining backups
Dates are useful when several versions represent changes over time.
For example:
- autoclicker-2026-08-01.json
- autoclicker-2026-08-09.json
- autoclicker-2026-08-15.json
Using the YYYY-MM-DD format also keeps date-based filenames naturally sorted in chronological order in many file managers.
4. Avoid accidentally deleting exports you may need
An exported file is only useful while it still exists.
If a configuration is important, consider including it in your normal file-backup routine rather than treating it as a temporary download.
5. Import applicable Auto Clicker files rather than unrelated JSON
JSON is used by many kinds of software.
A JSON file from a completely different application should not be treated as an Auto Clicker configuration merely because it has the same extension.
Choose files that you know were exported from the applicable Auto Clicker setup.
6. Export before major configuration experiments
If you are about to change many settings, create a checkpoint first.
This applies whether you are experimenting with an auto click mouse configuration, testing advanced Auto Clicker settings, or adjusting options that affect how the automatic clicker behaves.
A backup takes little organization compared with reconstructing a complex setup later.
7. Keep filenames tied to purposes, not vague labels
If you use multiple setups, name them for the task they support.
For example:
autoclicker-design-work.json
is more informative than:
new-settings-final-2.json
The same principle applies regardless of whether you obtained the application after searching for auto click software, best auto clicker software, or a download auto clicker page. Once you start creating valuable configurations, organization matters more than where you originally found the software.
Troubleshooting Data Import and Export in Auto Clicker
Most Data Import and Export problems are easier to diagnose when you separate file-location issues from file-selection issues.
Here are several common situations.
I Cannot Find My Data Import and Export File
If you exported a configuration but cannot find it later, start by checking the folder you selected in the Save As window.
If you remember the filename, use your operating system’s file search.
For the supplied example, search for:
autoclicker-data.json
If you chose another name, search for that instead.
You can also search for files ending in .json, although this may display unrelated JSON files from other applications.
Once you locate the correct file, consider moving it to a dedicated Auto Clicker backup folder.
I Have Multiple Data Import and Export Files
Multiple exports are not inherently a problem. In fact, they can be useful when they represent intentionally different configurations.
The challenge is knowing which file contains which setup.
Use filenames that include:
- The workflow
- The purpose
- The date
- The state of the configuration
For example:
autoclicker-work-2026-08-09.json
communicates more information than:
autoclicker-data-copy3.json
If you already have several vaguely named files, you may need to rely on when they were created and your own records to determine which is appropriate.
My Data Import and Export Configuration Is Not What I Expected
If an imported configuration does not appear to match what you intended to restore, first confirm that you selected the correct exported file.
Users maintaining several configurations can easily choose the wrong filename.
A useful checklist is:
- Was this file exported from the applicable Auto Clicker configuration?
- Did you select the correct folder?
- Did you choose the intended filename?
- Are you looking at the relevant settings after import?
- Do you have another export that better matches the configuration you expected?
Avoid manually editing the JSON as a troubleshooting shortcut unless such editing is explicitly supported by the application. Manual changes can create additional uncertainty when the simpler problem may be that the wrong file was selected.
Frequently Asked Questions About Data Import and Export in Auto Clicker
What Does Export Do in Auto Clicker Data Import and Export?
Export saves current Auto Clicker data to a separate configuration file.
In the supplied example, that file is a JSON file named:
autoclicker-data.json
The exported file can be retained so that you can select it later through Import.
What File Format Does Auto Clicker Use for Data Import and Export?
The exported configuration uses the JSON file format.
JSON is a structured data format commonly used by software to store information. You generally do not need to understand its internal syntax simply to export and import an Auto Clicker configuration.
How Do I Import Saved Auto Clicker Settings?
Open Auto Clicker → Configuration, locate the Data section, and select Import.
Then locate your previously exported .json file and complete the file-selection process.
After importing, check the relevant settings to confirm that you loaded the configuration you intended.
Where Should I Save My Data Import and Export Configuration File?
Save the file somewhere easy to remember and access.
A dedicated folder such as an Auto Clicker backups directory can make future imports much easier.
If you use several configurations, descriptive filenames and dates can help distinguish them.
Can I Keep Multiple Auto Clicker Configuration Exports?
Yes, keeping multiple exported files is a practical organizational approach.
For example, you might maintain:
- autoclicker-gaming.json
- autoclicker-work.json
- autoclicker-default.json
These names are examples you can choose yourself.
Using multiple files can be more convenient than constantly rebuilding different configurations.
Should I Export My Data Before Using Clear?
If your current configuration is important or you think you may want it again, exporting it first is a sensible precaution.
Export creates a separate saved configuration. Clear serves a different purpose and should not be treated as a substitute for a backup.
Do I Need to Edit the Exported JSON File?
Normally, no.
For the Import and Export workflow described here, the simplest approach is to let Auto Clicker create the JSON file and later select that file through Import.
Unless manual editing is officially supported for your application version, there is no need to alter the contents yourself.
Does Import Mean I Need Another Auto Clicker Download?
No. Import is a configuration-data function within the application workflow described here. It is not the same process as an auto click download or auto clicker download.
Once Auto Clicker is available and you have an appropriate exported configuration, Import is accessed through Configuration → Data.
Is Data Import and Export Related to Auto Clicker on Steam?
The terms may appear together in searches such as Auto Clicker on Steam or Auto Clicker on Steam Import and Export, but the important point for this guide is the specific interface being described: the Auto Clicker Configuration → Data area containing Export, Import, and Clear.
Do not assume that every autoclick application, Steam utility, or similarly named product stores configuration data in exactly the same way. Follow the controls available in the particular Auto Clicker you are using.
What If I Found Auto Clicker While Searching for Other Utilities?
Searches for terms such as autoclick, auto click, mouse clicker, automated clicking tools, good auto clickers, or best auto clickers can lead to many different applications and utilities.
The instructions in this guide concern the Auto Clicker interface described here. Features, filenames, and configuration systems can differ between products.
The same caution applies if you encounter unrelated names or topics such as Playsaurus or Custom Cursor on Steam while researching clicking tools or Steam-related utilities. Similar search contexts do not mean that different products share the same import/export system.
Does Import Affect Auto Click Speed?
Import restores the configuration information contained in the applicable exported Auto Clicker data. After importing, check your relevant settings including any settings that matter to your clicking workflow to verify that the intended configuration is active.
This is preferable to assuming that a particular individual setting changed without checking it.
Data Import and Export Best Practices for New Auto Clicker Users
If you are still learning how to use auto clicker tools, configuration backup may not be the first feature you think about. Most new users naturally focus on the clicking behavior itself.
However, configuration management becomes increasingly useful as soon as you begin customizing the application.
A simple habit is to create your first export once you have a setup you are happy with.
That creates a baseline.
From there, you can experiment without losing track of the configuration you originally preferred.
For example:
- Configure Auto Clicker.
- Test the setup.
- Export it once you are satisfied.
- Name the file clearly.
- Make further changes.
- Export another version if the new setup is worth keeping.
- Import whichever saved configuration you need later.
This approach works well whether you use the tool primarily as a mouse clicker, investigate automated mouse clicks for repetitive tasks, or simply want more control over configurations in auto clicker software.
It also makes comparison easier.
Instead of trying to remember which values belonged to which setup, your exported files become recognizable configuration checkpoints.
Data Import and Export and Responsible Configuration Management
An automatic clicker can automate repeated mouse input, but configuration management should still remain deliberate.
Export does not replace the need to understand the settings you are using. Instead, it complements that understanding by making useful configurations easier to retain.
This matters particularly when you experiment with different workflows.
This is especially helpful when experimenting with settings such as Auto Clicker click positions, timing, or other task-specific controls. Using descriptive filenames reduces the chance of selecting the wrong configuration later.
These practices are simple, but together they create a more predictable workflow.
They also help separate two different questions:
How should Auto Clicker behave?
and:
How should I preserve the configuration that produces that behavior?
The Configuration screen helps you address the first question. Data Import and Export helps with the second.
Save and Restore Your Auto Clicker Configuration With Data Import and Export
Data Import and Export in Auto Clicker provides a straightforward way to preserve customized configuration data and bring previously exported information back into the application when needed.
The core workflow is easy to remember:
Configure → Export → Save JSON → Import when needed
Export creates your saved configuration file.
Import lets you select a previously exported file.
Clear removes stored data instead of creating or restoring a backup.
For users who maintain customized setups, that small set of controls can make configuration management much more convenient. You can keep a backup before changing settings, maintain differently named exports for separate workflows, and restore a saved configuration without manually recreating every option.
The most useful habit is also one of the simplest: when you reach a configuration you would not want to rebuild from memory, export it.
Use a descriptive filename, store the JSON somewhere easy to find, and keep important backups organized.
To create your first saved configuration, open:
Auto Clicker → Configuration → Data → Export
Choose a memorable location, save the JSON file, and you will have a reusable copy ready for a future import.

Hotkeys: How to Start and Stop Auto Clicker with Ease

Auto Clicker App: How Customizable Profiles Enhance Automation

How to Use Macro Keys in Auto Clicker on Steam
About The Author
